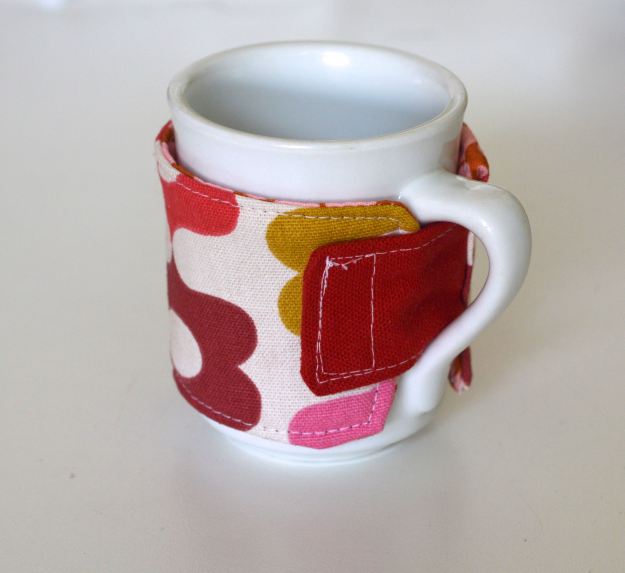
Sometimes it’s nice to have a go to project when you just want to say “thank you” with a handmade gift. In my book, a handmade thank you gift is something quick and easy. No fuss. This is why a coffee cozy makes a great thank you gift. It’s both of those things- quick and easy.
Personally, I like to make them for my kid’s teachers at the end of the year as a small appreciation gift. Sometimes I’ll even buy a little mug (usually from the Dollar Store), and then make them a coffee cozy to go with it. Combine that with a thank you card and a Starbucks gift card, and you’ve got yourself a teacher who finally feels appreciated!
I don’t know about you, but if I were a teacher, (while I would appreciate their thoughtfulness) I think the whole apple themed everything gifts would get old real quick. I’m proud to say, I’ve never bought my kid’s teachers anything with an apple on it. No offense if you have, I just want to provide them with someone variety:)
If you sell at your local Farmer’s Market or craft fairs, this would also be a quick sew and has the potential to be a good profit maker. Feel free to use this free pdf pattern to make coffee cozies for gifts, craft fairs, or to sell finished coffee cozies on Etsy.
Ready to learn how to make a coffee cozy? Let’s get started! Watch video below for a step by step tutorial.
Have you ever wanted to make a fun little clutch that you can whip up quickly, but looks amazing? If so, you are in the right place.
In the picture above here, you can clearly see that I am ready for a night out with my hubby. I’ve got my cute little clutch in hand, my skinny jeans on, and my new red leather ballet flats on (that I made from my Ballet Flats Sewing Pattern). It’s a good day!
Let keep things simple. Click on the orange link button below to download the free pdf sewing pattern to make your own Two-Tone Clutch.
Here’s what you’ll need for this project.
Now that you’ve downloaded the pattern and gathered up your materials. Let’s get started!
So at this point you should have cut out: 2 top front accent fabric pieces (polka dot fabric), 1 lining strap closure, 1 exterior strap closure, 2 bottom front clutch fabric pieces (black fabric on top right), 2 lining pieces (yellow multi colored fabric, and 4 fusible interfacings pieces, and 1 strap interfacing piece.
Iron on the strap interfacing piece. Then place strap closure pieces right sides together and sew around, but not all the way around. It can be difficult to turn the strap right side out if you sew a complete “U” shape. Let’s leave some wiggle room to turn this right side out. We’ll sew the edge up in a minute.
To help our curved seam to lay flat when we turn it right side out, let’s use some pinking shears to trim off the excess seam. If you don’t have pinking shears, just make little notches along the curve of the seam with the tip of your scissors.
Just to confirm what the picture above suggests, turn the strap right side out, pin the open edge, and topstitch around the strap as I have done here in the picture above.
Lay the strap and bottom front clutch pieces right sides together. You can sew a basting stitch to keep your strap in place if you’d like, or you can pin it. Then as you see on the right side of the picture here, just lay the top pattern right side down and sew across.
Once your done sewing the front of the clutch and pressing the seam, topstitch across as you see in the picture below.
Below is a photo I took after I sewed on the garland. You can sew the garland on with your machine, or you can hand sew them on if you are new to sewing. I used embroidery thread for the garland hanging line.
Here’s a picture of how my garland hanging line looks from the back.
Time to add some stability and structure to this clutch!
We want more space inside of our clutch, so let’s make this clutch three dimensional by boxing out the corners.
I’ve turned the lining right side up and upside down to show you how the boxed corners should look once your done.
As I mentioned before, you will need to repeat step 8 for the exterior clutch as well. Once they are both boxed out, insert the lining into the clutch as shown below. When you look inside the clutch, you should be looking at the beautiful lining side of your lining fabric.
Let’s finish this pretty little clutch off with some 1/4″ double folded bias tape to hide those raw edges on top.
Now we are ready to slowly and carefully secure our bias tape in place. Start with the raw end (meaning: not the end you just folded in the picture above). Start where you see the pink binding clip in the picture below. Press and pinch the bias tape in place to secure it as you wrap it around the top. Secure with binding clips, pins, or bobby pins. Whatever you have.
After a few minutes the glue should be dry. Sew the bias tape in place.
Sew on your button.
Measure your button and then prepare to make a button hole. You can make a button hole with your machine or you can make a hand sewn button hole. Just do a quick search on Youtube for a tutorial on how to do it.
Congratulations, you’re all done! Please share what you’ve made with me on Instagram or in my Facebook group. I want to see what color combinations your coming up with and your fantastic creation!
Link
If you’ve ever wondered how to finish off a pillow, a purse, a stuffed animal, or baby shoes with a hidden stitch, you’re in the right place! Please enjoy this video that I created to help you understand how to hand sew an invisible stitch:)
Time for a free pattern! My first free pattern ever I might add. I have a long list of free patterns I want to release over the next year, but this one kept begging to be first, so I gave in. And I’m happy I did, I think you guys and your kids are going to love this super cute quick pattern! You will find the Free Fox Ears Pattern at the bottom of this post.
Did I mention this pattern is not just for kids? Yup, it comes in adult sizes too! For some reason I just couldn’t get myself motivated to put on my Fox Ears and have the kids take pictures of me. Sorry guys! Maybe next time:)
I love that these Funky Fox Ears will keep her ears nice and warm when it’s cold outside!
Hey, and check this out! Remember the Animal Hoodie Pattern I sell with the Bear Ears? Well now you can swap out the bear ears for fox ears! Just use the fox ears in place of the bear ears when you get to that part of the tutorial. I just added a section to the Animal Hoodie tutorial entitled “How to Add Fox Ears”. It shows you how to sew up the fox ears and how to sew them in. How cool is that?!
I have a little story for you guys today. Did you know that before I started designing sewing patterns I used to crochet like a mad woman? Yes, it’s true! When my oldest daughter was about two years old I started designing and crocheting lots of animal hats for her to wear. She absolutely loved them. I felt a deep sense of satisfaction as I saw how much these little animal hats were helping her to use her imagination. Then when other kids came over she would get the hats out and they would all start jumping around and having a great time in their imaginary worlds. Precious times without a doubt.
Inevitably she kept growing, but sadly the hats did not. However, her desire to still play with them was still going strong! I had to chuckle as I watched her trying to cram and squeeze her head into these little toddler hats I had made so long ago. That’s when I decided it was time to put my hand to designing and come up with a kid friendly animal hat/hoodie. It’s been two years since then and they’ve gotten plenty of use out of them. But better yet, the pretend play lives on!
Now when their friends come over, all the fox ears come out! Whenever I start working with a pattern, I make a ton of them before I make my final piece for pictures. So needless to say, they’ve got LOTS of Fox Ears to play with now. I think they’re happy about it!
So I would love to hear your thoughts on this new free pattern. What do you think? Do you like it? Let me know how they turn out for you in the comments below!